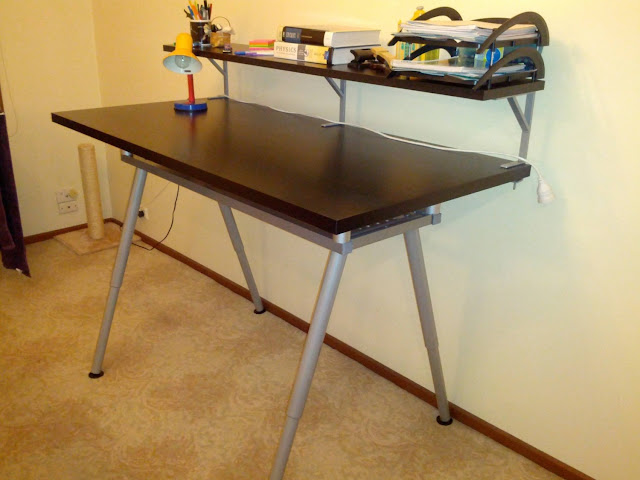
Materials: VIKA AMON 150x75cm table top, Galant 120x60cm table base & 4 Angle legs, 2 x BESTÅ leg packs (2 per pack, total of 4), 2 pieces of wood (600mm x 65mm x 18mm each or similar), 4 x M8 30mm hex head bolts, 4 x M8 50mm hex head bolts, 4 x M8 washers, drill & drill bits, 16+ x 30-40mm long wood screws, optionally add EKBY shelf with EKBY TÖRE brackets
Description: The idea came about as we wanted a standing table ~1m high, and on arriving at Ikea found out that the VIKA BYSKE legs (that go to 107cm high) are currently recalled. According to the store, it was a world wide recall. We had already decided we wanted something more than 60cm deep, which w as how we decided on the VIKA AMON table top (75cm deep).
Stability was important, so I put my thinking cap on and came up with what you see. The BESTÅ legs were a last minute inspiration walking around the self-service furniture area on the way to the checkout. Originally I was going to use some wooden blocks and M8 threaded rod (which I have lots of for other reasons), but when I saw the BESTÅ legs, I just knew they'd be perfect and that I had to use them, despite it being slightly more expensive. Sure it's not the cheapest standing table, but we're quite happy with it.
Step 1: Drill the corner holes in the GALANT frame all the way through (8-9mm dia). Clamp one piece of wood onto the frame where the holes are and centre it so the same amount is sticking out each side. Drill both holes all the way through the timber (8mm dia). Repeat for the other side and piece of wood. They should be identical anyway, but I did it this way in case I was slightly off-centre with one side.
Step 2: As I couldn't find M8 countersink screws on a Sunday, I improvised. Countersink the holes using a 13mm dia drill to approximately the height of the hex head for the M8 30mm bolts. Put the wood on something stable with a hole in it (I used half a brick I had lying around), and put the M8 30mm bolt through the hole. Hit the bolt head with a hammer till the head of the bolt is flush with the timber. Repeat for remaining timber holes & M8 30mm bolts.
Step 3. Unscrew the plastic feet from the BESTÅ legs, just leaving the Aluminium piece in the centre. Screw these onto the M8 30mm bolt threads sticking out of the timber pieces. Using the M8 50mm bolts and the M8 washers, screw the GALANT frame into the other side of the BESTÅ legs (drilled hole side goes to the BESTÅ legs).
Step 4: Invert the VIKA AMON table top, and place the new GALANT frame assembly on it, timber down. Centre the frame assembly on the desktop and secure with the wood screws (I countersunk mine, as they were a little short). If you drill pilot holes for the screws, make sure they are well undersized, so the screws bite into underside of the VIKA AMON table top. I used 4 screws per corner (for a total of 16), but may add more later (possibly between the BESTÅ legs).
Step 5: Add the legs, adjust each to the same height, and then stand the table up. You're done!
At full leg extension we measured the surface of our table at 101cm. We also garnished ours with a EKBY shelf mounted with EKBY TÖRE brackets (matched well with the VIKA AMON series tabletop).
Notes:
1. At full extension, the legs sit wider than the table top (front to back). This means it doesn't quite sit up against the wall, but this isn't an issue for us and we prefer the stability of the angled legs.
2. If I feel the stability isn't quite there, I'll go buy another pack of BESTÅ legs and put them between the existing ones (front to back), and put them on the centre of the frame so the welds on the GALANT frame edge are carrying less weight.
3. Another possibility is to use longer pieces of wood and run the wooden supports that attach to the table top from left to right rather than front to rear. This would provide ample places to screw the wood to the table all over (eg: nearer the existing leg holes in the VIKA AMON table top).
~ Cefiar, Melbourne, Australia


Post A Comment:
0 comments:
Post a Comment