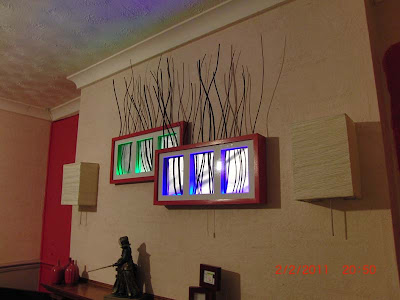
Materials: Materials:- 3x Large 50x23cm Ribba Frames, 1x Multi-Colour Dioder set, 1 Bundle of Torka, Kitchen Foil, Sticky Tape, Black Marker Pen, Wood Screws, Electrical Connector Blocks, Paint (optional), Pull Switch (optional). Tools:- Drill and Drill-bits, Electrical Screwdriver, Hot Glue Gun, Tape Measure and Square (or good eyes), Paint Brush (optional)
Description: Having seen the excellent original 'Torked-out Ribba' frame - I decided to make something of a larger feature piece using some large Ribba frames I already had, since I needed a feature for my fire-place.
Ok... my frame is slightly more complex then the previous one so I will include specific instructions for this version. I have attempted to be as consise as possible with the availiable picture limitation - but this is a hard one to describe with words.
To begin:
1) Place one of the frames so that it is overlapping the back of another by the desired amount. Then when you are sure it is absolutely square mark its location with a pencil.
2) Remove the glass/paper/backing board from the frames.
3) Chop off the corner to the marked frame and align it with the frame which you used to mark it.
4) Drill holes in the whole frame and pilot holes in the now exposed ends of the cut frame and screw them together so that you end up with one large frame.
5) Place the third frame above the chopped frame so that it overlaps the other and drill the cut frame (from the back) and attach it with wood screws (again using pilot holes where necessary).
6) Drill holes in the top / middle of the rear and front frames respectively (for the Torka branches later) and then dis-assemble the front frame from the cut one.
7) Paint the frame (Optional) and allow to dry.
8) Chop one corner off of each of the backing boards and face with kitchen foil (opaque side showing) - use sticky tape to fix.
9) Dummy position your electrics and drill an appropriate hole from the rear frame to the cut frame area for the dioder set to go through.
10) Optional - using a wiring block - attach the dioder control box to each pair of lights inverting the two middle wires (so the lights cycle different colours)
11) Place the glass/white paper frame into the front frame and fix using the metal bits inside the frame.
12) Glue the dioder strips in the front frame in place using hot glue and then the foil coated backing board - ensuring it stays flush with the rear of the frame and does not fall into the frame. Use the chopped corner of the backing board to push the electrical wires / control box through.
13) Using the screws used beffore, re-assemble the front frame with the rear/cut frame section.
14) Place the glass/white paper frame into the rear frame and fix using the metal bits inside the frame.
15) As with the front frame - glue the dioder strips in the front frame in place using hot glue and then the foil coated backing board - ensuring it stays flush with the rear of the frame and does not fall into the frame. This time position the cut-off corner so that it is in the outer-top corner of the frame for hanging. The wire to the control box will pass through the hole drilled previously.
16) Attach the electrical control box, pull switch (optional), and transformer to the hacking board of the front frame using hot glue.
17) Hang and connect frame to mains power.
18) Insert Torka sticks. The previous one made use of two bundles... I didn't and simply chopped one bundle into three, and used the top two sections of each. I used a black marker pen to ensure the cut ends were black.
ENJOY :-)
I would like to thank Michael for the original inspiration... I hope that everyone including Michael can accept that this is a separate hack and I wanted to give back! :-D Please show me pics if you create one of these!
~ Matt, Glasgow, United Kingdom


Post A Comment:
0 comments:
Post a Comment